API signing#
Antavo adds an additional layer of security to https transportation by requiring every request to be signed. This ensures data transmission integrity by providing a means for identifying any in-transit changes. Antavo ELC uses Escher, a stateless HTTP request signing specification which is a modified and expanded version of the AWS Signature Version 4 request signing protocol. To sign a request, a hash (digest) of the request must be created and then used, in conjunction with other request values and your access key, to create the signature, a signed hash. This should be added to the request using the HTTP Authorization header. There are open-source libraries, e.g., EscherPHP, EscherAuth in Go, which can be adapted and incorporated into systems, if required.
Note
A signed Postman request is the only way to access information from APIs in production environments. A Postman Pre-Request script for generating and attaching signatures to requests is available and please reach out to your Antavo contact for further information/assistance.
The signature generation protocol#
Warning
API signatures should not be generated on frontend implementations as this could potentially expose API keys and secrets.
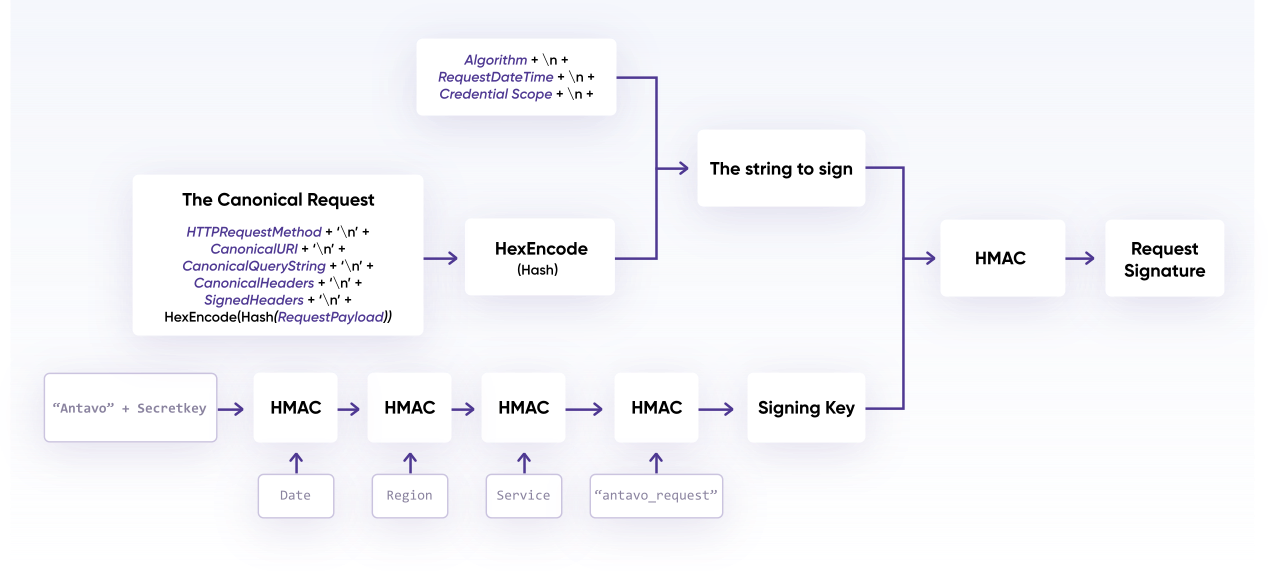
A canonical request is created.
The canonical request and additional meta information is used to create a String to Sign.
The Request Signature is created from signing the String to Sign with a signing key, derived from the Antavo secret access key (API secret).
The resulting signature is added to the HTTP request in a header
The same calculation is performed server side when the ELC receives a request. The newly calculated signature is compared to the submitted signature. The API request is denied if the two signatures are not identical.
All URL paths should be normalized according to the RFC3986 - Uniform Resource Identifier standard. Failure to follow these steps will result in the creation of an invalid signature and result in all signed requests being automatically rejected.
Step 1 - The Canonical Request#
A standardized (canonical) request can be created using the following pseudocode
CanonicalRequest =
HTTPRequestMethod + '\n' +
CanonicalURI + '\n' +
CanonicalQueryString + '\n' +
CanonicalHeaders + '\n' +
SignedHeaders + '\n' +
HexEncode(Hash(RequestPayload))
The HTTP method (RFC2616 - Hypertext Transfer Protocol) must be in upper case
All dates are in the condensed iso8601 form
All HexEncoded data must be lowercase base-16 encoded
The CanonicalURI#
The URI-encoded version of the absolute path component of the URI – everything in the URI between the net location and query string parameters (if any). Each path segment must be URI-encoded. A forward slash (/) should be used for an empty absolute path.
CanonicalQueryString building protocol:#
The query string in a Url starts with a question mark(?) is then followed by parameters and associated values.
Note
An empty string, a blank line, should be used for a query-free request.
Sort the parameter names by character code point in ascending order e.g., alphabetically sorted with uppercase letters preceding lowercase. The parameters/values should be URI-encoded
Do not URI encode any unreserved characters, according to RFC 3986:
A-Z, a-z, 0-9, hyphen ( - ), underscore ( _ ), period ( . ) and tilde ( ~ )
Percent-encode all other characters with %XY, where X and Y are hexadecimal characters (0-9 and uppercase A-F). Extended UTF-8 characters must be in the form %XY%ZA%BC.
Warning
spaces must be encoded as %20 (not ’+’)
commas must be encoded as %2C
Build the canonical query string by starting with the first parameter name in the sorted list. For each parameter:
Append the URI-encoded parameter name
Add the equals sign character (=)
Add by the URI-encoded parameter value. Use an empty string for parameters with no values
CanonicalHeaders list building protocol:#
This is a list of all HTTP headers included with the signed request. The minimum requirement is the host header and standard headers. like content-type, are optional. Different services might require other headers.
CanonicalHeaders =
CanonicalHeadersEntry0 + CanonicalHeadersEntry1 + ... + CanonicalHeadersEntryN
CanonicalHeadersEntry =
Lowercase(HeaderName) + ':' + Trimall(HeaderValue) + '\n'
Convert each Header Name/Value pair to lowercase and remove leading spaces and trailing spaces. Convert sequential spaces in the header value to a single space.
Build the list by sorting the (lowercase) headers by character code and then iterating through the header names adding the header pairs in the following format:
{HeaderName}:{HeaderValue} + “\n”
Multiple HeaderValues should be added as a non-sorted comma-separated list of values for that header.
The following examples compare a more complex set of headers with their canonical form
Original headers
Host:api.antavo.com\n
Content-Type:application/x-www-form-urlencoded; charset=utf-8\n
My-header1:    a   b   c  \n
Date:20170307T082102Z\n
My-Header2:    "a   b   c"  \n
Canonical headers
content-type:application/x-www-form-urlencoded; charset=utf-8\n
date:20170307T082102Z\n
host:api.antavo.com\n
my-header1:a b c\n
my-header2:"a b c"\n
Signed headers#
A lowercase sorted list of semicolon-separated canonical headers. The host header and a date header, if present, must be included in this list.
HexEncode(Hash(RequestPayload))#
A Hash is a function that produces a message digest, typically SHA-256. The hashing algorithm is specified in a later step but should be consistent throughout. HexEncode is a function that returns the base-16 encoding of the digest in lowercase characters. Each input byte must be represented as exactly two hexadecimal characters e.g., HexEncode(“m”) returns 6d.
These functions are used to produce a lowercase hex encode hashed value of the HTTP request payload, as defined by Section 8 of RFC 4648. Any signing algorithm can be used but it should be specified in the string to sign e.g., the SHA256 algorithm should be reported as ANTAVO-HMAC-SHA256. However, some Antavo services might require a specific encoding and their corresponding documentation will contain further information. An empty string should be used for an empty payload.
Step 2 - The string to sign#
The string to sign includes meta information about the request and the canonical request. This in conjunction will be used, with a derived signing key, to calculate the request signature in Step 3. The String is a concatenation of the algorithm, date and time, credential scope, and digest of the canonical request, as shown in the following pseudocode: .. code:
StringToSign =
   Algorithm + \n +
   RequestDateTime + \n +
   CredentialScope + \n +
   HashedCanonicalRequest
Algorithm#
The hashing algorithm used throughout the signing procedure. Currently, only the standard SHA256 hashing algorithm (ANTAVO-HMAC-SHA256) is currently supported.
RequestDateTime#
The date is specified with ISO8601 basic format in the date header in the format YYYYMMDD’T’HHMMSS’Z’ (the date timezone must be UTC). This value must match the previous used values.
The Credential Scope#
A string with the following format
{Date}/{Region}/api/antavo_request\n
The date must be in YYYYMMDD format and does not include a time value. The Region corresponds to the target region and can be found on the API settings page of the Antavo Enterprise Loyalty Cloud. Api states the service being requested and the antavo_request is the termination string. The region and service name strings must be UTF-8 encoded.
HashedCanonicalRequest#
This is the lowercase base-16 encoded hashed Canonical Request. The digest (hash) of the canonical request must be made with the same algorithm that used to hash the payload.
Step 3 - The Request Signature#
A signing key, derived from the Antavo secret access key (API secret), is needed before a signature can be generated. The signing key is date, service, and region specific and thus offers a greater degree of protection. This signing key and the String to Sign (Step 2) are used as the inputs to a keyed hash function. The resulting hex-encoded result from the keyed hash function is the signature.
1. Generate a signing key.#
The secret access key is used to create a cascading series of hash-based message authentication codes (HMACs):
Signing key Pseudocode
kSecret = secret key
kDate = HMAC("ANTAVO" + kSecret, Date)
kRegion = HMAC(kDate, Region)
kService = HMAC(kRegion, Service)
kSigning = HMAC(kService, "antavo_request")
HMAC(key, data) represents an HMAC-SHA256 function that returns binary format hash (digest). These examples have the key as the first parameter followed by the data (message). It is critical to ensure that your implementation correlates to this key/data scheme. The date used in the hashing process is YYYYMMDD format e.g., 20170307 and does not include the time.
2. Generate the Signature#
The final signature is made using the signing key and string to sign as inputs to the keyed hash function. The signature is converted from the binary value to a hexadecimal representation only after the final digest calculation:
signature = HexEncode(HMAC(derived signing key, string to sign))
Step 4 - Add the Signing Information to the Request#
Signing information can be added to a request by using an HTTP header named Authorization. The contents of the header are created after calculating the signature so the Authorization header is not included in the list of signed headers.
The following pseudocode shows the construction of the Authorization header.
Authorization: algorithm Credential=access key ID (Antavo API key)/credential scope, SignedHeaders=SignedHeaders, Signature=signature
- Note that :
There is no comma between Authorization and Credential. However, the SignedHeaders and Signature are separated with a comma.
The Credential value starts with the access key ID (Antavo API key), which is followed by a forward slash (/), which is followed by the credential scope calculated in Step 2. The secret access key is used to derive the signing key for the signature but is never included in the signing information sent in the request.
Examples#
GET request#
This example request is a GET request (method) that makes a reward list API call to the Antavo Rewards API. This action takes the min_price and max_price parameters. This example has also been codified using python. This request will fail due the non-existent API host and the timestamp being outside of the acceptance window. However, it does provide several comparison points to help ensure your implementation is Antavo compatible.
Raw Request
GET https://api.antavo.com/rewards?min_price=50&max_price=125 HTTP/1.1
Host: api.antavo.com
Content-Type: application/x-www-form-urlencoded; charset=utf-8
Date: 20170307T082102Z
Step 1
To create the example canonical request, concatenate the following components into a single string:
HTTP request method, followed by a newline character.
GET + “\n”The canonical URI parameter, followed by a newline character.
/rewards+ “\n”The canonical query string (sorted), followed by a newline character.
max_price=125&min_price=50+ “\n”The canonical headers, followed by a newline character.
content-type:application/x-www-form-urlencoded; charset=utf-8\n
date:20170307T082102Z\n
host:api.antavo.com\n
Signed headers
content-type;date;host\nSHA256 hashed payload (empty string)
e3b0c44298fc1c149afbf4c8996fb92427ae41e4649b934ca495991b7852b855
The finished canonical request. Each component ends with a newline character except the last line the hashed payload.
Canonical Request
GET
/rewards
max_price=125&min_price=50
content-type:application/x-www-form-urlencoded; charset=utf-8
date:20170307T082102Z
host:api.antavo.com

content-type;date;host
e3b0c44298fc1c149afbf4c8996fb92427ae41e4649b934ca495991b7852b855
Step 2
To create the string to sign, concentrate:
The algorithm designation, followed by a newline character.
ANTAVO-HMAC-SHA256\nRequestDateTime, followed by a newline character.
20170307T082102Z\nThe credential scope value, followed by a newline character
20170307/ml/api/antavo_request\nThe hashed canonical request. This value is not followed by a newline character.
0bb2a9aea48875fc8dfa72edadfa03e80b65cde967c6099bfde179bb7f25b971
The finished String to Sign
ANTAVO-HMAC-SHA256
20170307T082102Z
20170307/ml/api/antavo_request
0bb2a9aea48875fc8dfa72edadfa03e80b65cde967c6099bfde179bb7f25b971
Step 3
This step uses a secret key (kSecret) of jOw3hkZKdc6+rWzClEXAMPLEKEY to derive a signing key for a request to the API in the ml region on Mar 7, 2017.
Input data
HMAC(HMAC(HMAC(HMAC("ANTAVO" + kSecret,"20170307"),"ml"),"api"),"antavo_request")Derived signing key (HexEncode)
c9f546331b794c9d84d07d2e424c60f51ed0b3301c99526f4db80d75dbc923d4Example signature
581f91967265ef79c2c2fef0bda679bc77bd2875c885107b6e2edaca0221b801
Step 4
A finished Authorization header.
Authorization: ANTAVO-HMAC-SHA256 Credential=ANYHRA4VTAAAEXAMPLE/20170307/ml/api/antavo_request, SignedHeaders=content-type;date;host, Signature=581f91967265ef79c2c2fef0bda679bc77bd2875c885107b6e2edaca0221b801
This code is available as a python script here.
POST request#
There are two python examples/templates for creating a Post event.
A simple python POST script
examplePOST_mt.py, using a modified AWS protocol, is provided with the corresponding keysteps.An Escher based modular approach. Here, the escher authorization module
escherauth.pyis called by a scriptexampleEscher_mt.py. This approach can easily be incorporated into a large setup.Note
There are some issues using official Escher python libraries, particularly with those wrapping the GO libraries. The simplest most successful method is to manually create a local module using the supplied file as shown in the example script.
PHP#
There is a fully working PHP library (EscherPHP) which can calculates the signature. Requests can be both signed and verified using the following configuration:
Escher::create('rc/api/antavo_request')
   ->setVendorKey('Antavo')
   ->setAlgoPrefix('ANTAVO')
   ->setDateHeaderKey('Date')
   ->setAuthHeaderKey('Authorization')