The Antavo Javascript SDK provides a rich set of tools for implementing client-side loyalty program elements on ecommerce stores. The Javascript SDK can:
embed the Loyalty Hub
display the points earned by purchasing a product
display notifications of the Loyalty Program
promote rewards to your customers
attach quizzes to articles or videos
call in events to the Events API
The SDK can be easily initiated using the following code snippet in the webpage which will asynchronously load and initialize the SDK. Placeholder data should be replaced with the corresponding Antavo account details and snippet:
Note
Asynchronous loading means that loading and injecting the SDK code into your web site will not prevent or block any content on the webpage from loading.
<script async>
(function(t,u,c) {
var d = document,
o = d.createElement(t),
s = d.getElementsByTagName(t)[0];
if (c) { o.onload = c; }
o.src = "//" + u;
s.parentNode.insertBefore(o, s);
}("script","api.ENVIRONMENT.antavo.com/sdk/latest",function() {
Antavo.SDK.init("ANTAVO_API_KEY", "CUSTOMER_ID");
}));
</script>
Placeholders
ANTAVO_API_KEY:The API key is located in the Loyalty Platform . This key should be pasted into the code snippet and any errors messages will be printed to the Javascript console. More info regarding debugging the SDK can be found in the Testing section.
CUSTOMER_ID:The customer ID is a unique string which identifies the customer within in the loyalty program.
ENVIRONMENT:The corresponding region of a brand can be found in . e.g., an API settings of “Your API Region: st2” results in
api.st2.antavo.com/sdk/latest
Client-side processes#
Sending in events#
Events, built-in or custom, can be sent in, with their unique set of parameters (configurable in the Loyalty Platform), using the send() method.
Antavo.SDK.send()
Examples#
This code sends an event from a Javascript-based game to Antavo when a player earns a power-up:
Antavo.SDK.send('collect', { type : 'power_up_health', multiplier : 2});
This is a basic example of a potential add_to_cart event:
Antavo.SDK.send('add_to_cart', { items : [ 'PRODUCT_SKU_1', 'PRODUCT_SKU_2' ] });
Warning
It is strongly suggested to overload the Antavo.SDK.send() with all parameters to avoid event submission failure due to modifications made to the event on the loyalty platform.
Page visit#
Pages can be tracked by including and initializing the SDK then calling the page with an additional query string parameter __al, with the value of 1.
The SDK automatically removes the __al parameter from the URL in the browser’s URL bar without reloading the page.
A visit event will be sent along with the top location string as the URL parameter.
http://yoursite.com/article/first-article?__al=1
Handling customers#
The SDK required a valid customer ID in order to work.
The customer ID must be unique but can be associated with the internal customer ID’s.
The SDK should be initiated in guest mode if there is no customer ID available e.g. the customer is not logged in.
Guest mode is activated by not providing a customer ID or by submitting a null value, the preferred option in order to specify an options object.
Note
The share_impression event is the only submitted event which do not use the currently authenticated customer. This event is submitted using the customer ID extracted from the share hash in the url. The event is not submitted if there is no hash present.
Do not send an empty string for a customer ID
Antavo.SDK.init('YOUR_API_KEY', '');
This code is valid as an empty string can be used as a customer ID. However, data intergrity and problems may arise if this ID matches a valid customer within Antavo. Always send null value or simply omit this parameter if there is not a logged-in customer on a page.
Do not prevent initialization of the SDK for guest customers
if (customerID) {
    Antavo.SDK.init('YOUR_API_KEY', customerID);
}
Share impression tracking and many other modules will need to be initialized for guest customers. The SDK can handle anonymous and/or opted-out customers and will only display the loyalty program if allowed.
Initialize SDK for guests
Antavo.SDK.init('YOUR_API_KEY', null, options);
SDK Initialization#
An object can be passed as the third parameter of the Antavo.SDK.init() call in order to override default configuration options coming from the servers.
Authentication#
The authentication method chosen in the Loyalty Platform can be overridden using the auth object:
Key |
Values |
Description |
|---|---|---|
cookie |
|
Specifies whether the SDK should set an authentication cookie: true enables the default host-based authentication method requires true whilst false is required for social authentication |
method |
|
Sets the authentication method: cookie mode uses host-based authentication method and social authentication method used the social keyword. |
* default value
The initialization of the SDK with social authentication:
Antavo.SDK.init('TEST_API_KEY', 'TEST_CUSTOMER_ID', {
    auth {
        cookie : false,
        method : 'social'
    }
});
Tracking#
The SDK provides automated mechanisms to submit visit events and to change how customer hashes are added to the location of pages.
These can be configured them by providing the following object under the tracking key:
Key |
Values |
Default |
|---|---|---|
|
Enables sending visit event when scrolling reaches 50% of the current page. |
true |
|
Enables the use of customer hashes in the URL. The
method to use can be specified by setting the
|
true |
|
Defines how the customer hash will be appended to the
URL. Setting it to |
‘hash’ |
Antavo.SDK.init('TEST_API_KEY', 'TEST_CUSTOMER_ID', {
    tracking : {
        autoSend : true
    }
});
Video#
The SDK’s video-related mechanisms (video banner, content quiz appearance after video views) can be configured through the following options in an object under the video key:
Key |
Values |
Default |
|---|---|---|
|
Enables video actions for videos embedded on your website |
true |
Antavo.SDK.init('TEST_API_KEY', 'TEST_CUSTOMER_ID', {
    video : {
        enabled : false
    }
});
Notifications#
Customer notifications can be enabled/disabled on your website. These notifications include pop-up messages when the customer receives points or Content Quizzes if they are already enabled and configured.
Key |
Values |
Default |
|---|---|---|
|
The SDK will display notifications on your website if the user got points for completing an activity (eg.: reading an article, watching a video). Set this to false in case you’re using the SDK within an <iframe> and its parent frame, too, to prevent notifications from appearing twice. |
true |
Antavo.SDK.init('TEST_API_KEY', 'TEST_CUSTOMER_ID', {
    notifications : false
});
Note
Customers not yet opted in to your loyalty program or those who have opted out will not receive notifications, regardless of this setting.
Performance#
It is recommended to put the SDK initialization script immediately before the </body> closing tag to prevent any blocking that could affect the Google’s Pagespeed score.
It is also more elegant and a better user experience to load the HTML and CSS before the asynchronous load of the SDK.
Testing#
There are several approaches for client-side testing.
A working Antavo.SDK.send() call means that the requests to the Events API are well formed.
However, the integrity of the data as well as the configuration of the actions should also be checked.
Debugging#
The following check list provides a systematic approach to check that the Javascript SDK is working.
Check the developer console for errors. If an API calls fails, errors will be instantly reported to the console, independently of the SDK being debug mode.
Check the API error log on the Loyalty Platform. Sent Requests and responses will be received side by side, as well as any error code returned by the API
Check if the customer is authenticated.
Antavo.SDK.send()automatically drops all events if there are no explicit customer IDs associated to them.Check if the
Antavo.SDKis loaded and initialized.
The Javascript SDK can also be safely enabled in debug mode by adding /debug to the SDK endpoint:
<script>
(function(t,u,c) {
var d = document,
o = d.createElement(t),
s = d.getElementsByTagName(t)[0];
if (c) { o.onload = c; }
o.src = "//" + u;
s.parentNode.insertBefore(o, s);
}("script","api.API_REGION.antavo.com/sdk/latest/debug",function() {
Antavo.SDK.init("YOUR_API_KEY", "CUSTOMER_ID");
}));
</script>
The debuging debug mode provide the following auxillary information
The authentication process logs verbose output to the developer console.
Antavo.SDK.send()logs the requests sent and the response received to the console.Communications with Antavo servers are logged to the console so the Antavo support team can investigate possible issues.
Debugging functions#
These are accessible using the following browser’s developer console.
Google Chrome: Ctrl + Shift + J (Windows / Linux) or Cmd + Opt + J (Mac)
Mozilla Firefox: Ctrl + Shift + J (or Cmd + Shift + J on a Mac)
Microsoft Edge / Internet Explorer: F12
Antavo.SDK.getCustomerId():Returns the customer’s ID used to initiate the SDK.
Antavo.SDK.getCustomer():Returns the customer object if the SDK is correctly initialized This can be used to checkt the current customer’s score, level, image url etc. Incorrect initiation results in a null value.
Antavo.SDK.getBrand():Returns the brand’s custom ID and the alias url (CNAME) pointed to the Antavo servers.
Antavo.SDK.getExtensionInfo():Returns the enabled extensions with their properties.
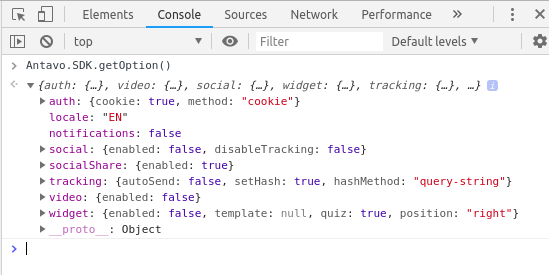
Antavo.SDK.getOption():Returns the configured options when initializing the SDK.
Social networking#
You can configure SDK’s share impression tracking and social network-related mechanisms through the following options in an object under the
socialkey:Key
Values
Default
enabledtrue|falseEnables share impression tracking and other social networking functions in the SDK. Be aware that this will load and initialize Facebook, Twitter and SDKs if they’re not already initialized. If you don’t want to track share impressions you can safely set this to false.
true